Before you start
IMPORTANT:
- Not all Sony TVs have the ability to connect to a wireless (Wi-Fi) network. To verify whether your TV is compatible, check the TV specifications available in the supplied manual.
- The setup procedure differs depending on the type of network and LAN router. Before setting up your Internet connection, be sure to set up a wireless LAN router.
To connect to the Internet, devices such as hubs, routers, etc. are necessary in addition to the BRAVIA TV. Furthermore, the connection method varies depending on your device.
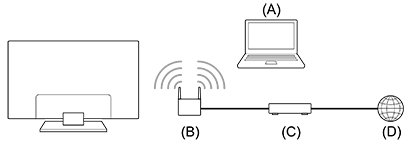
- A: Computer
- B: Wireless router
- C: Modem
- D: Internet
How to set up your TV
The steps differ depending on your TV model type:
Hints:
Check out the video below to learn how to connect to Wireless (Wi-Fi) Network on your Sony Google TV
![]()
Tip: Learn how to turn captions on or off when watching Internet videos from YouTube
Follow the steps below:
- Open the
 Settings screen. How to access Settings
- If your remote control has a Quick Settings (
 or
or  ) button, press the Quick Settings button and select Settings.
 - If your remote control does not have a Quick Settings ( or ) button, press the HOME button and select Settings.
- The next steps will depend on your TV menu options:
- Select Network & Internet → Wi-Fi.
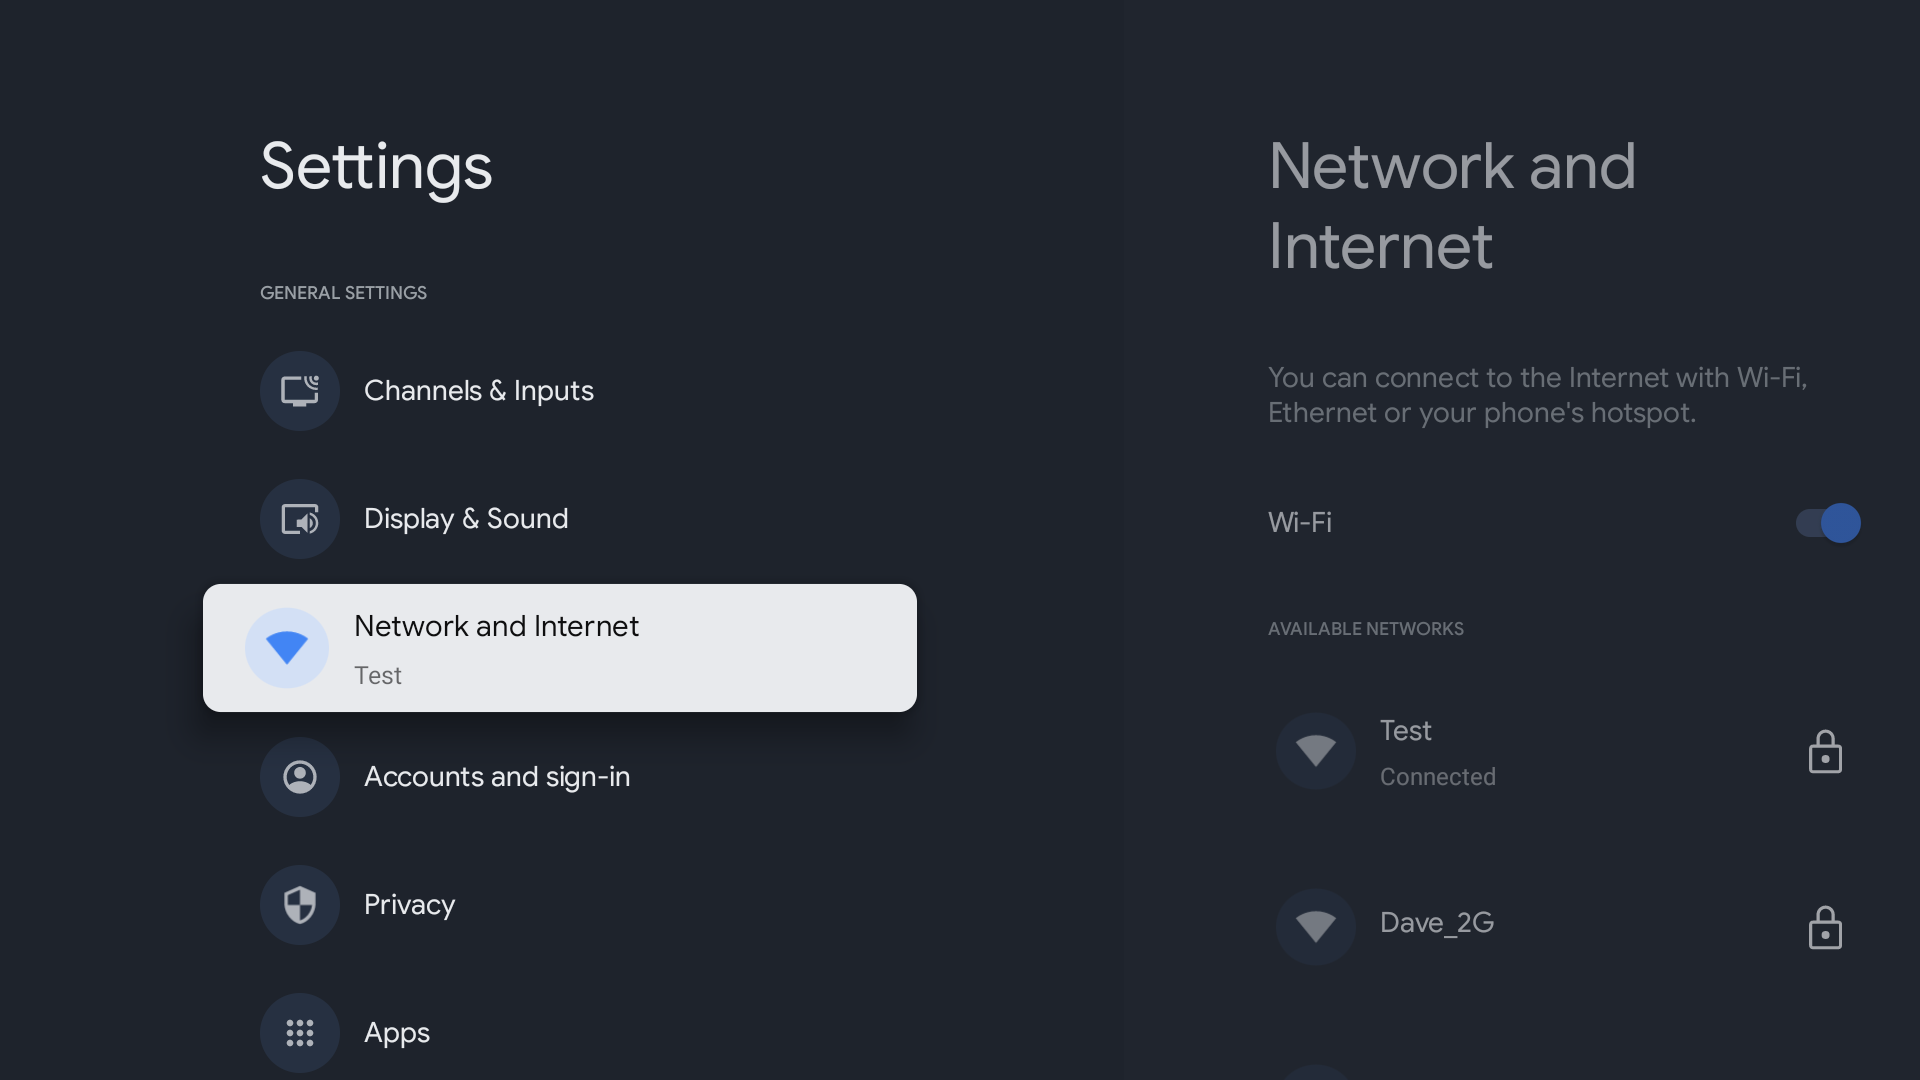
- Select Network & Internet → Easy setup → Wi-Fi.
- Select Network → Network setup → Easy → Wi-Fi.
- Select your Wi-Fi network.
Notes:
- Follow these steps if a screen appears prompting you to select how to connect to your wireless router:
- When connecting manually after selecting a network from the list of scanned wireless networks
Select Connect by scan list. - When connecting automatically with the WPS button on your wireless router (or access point)
Select Connect by WPS button.
- If you do not know the SSID (wireless network name) and password (security key) of your wireless router (or access point), refer to the manual of your wireless router (or access point).
- To connect your TV to a hidden network, refer to this article: How to connect the Google TV or Android TV to a hidden network.
- Follow the on-screen instructions to complete the setup.
Notes:
- After selecting your network from the scan list, press the Enter button on your remote control while the text field is highlighted to activate the on-screen keyboard. Then, input the security key for your network and press NEXT/ENTER or FINISH to proceed.
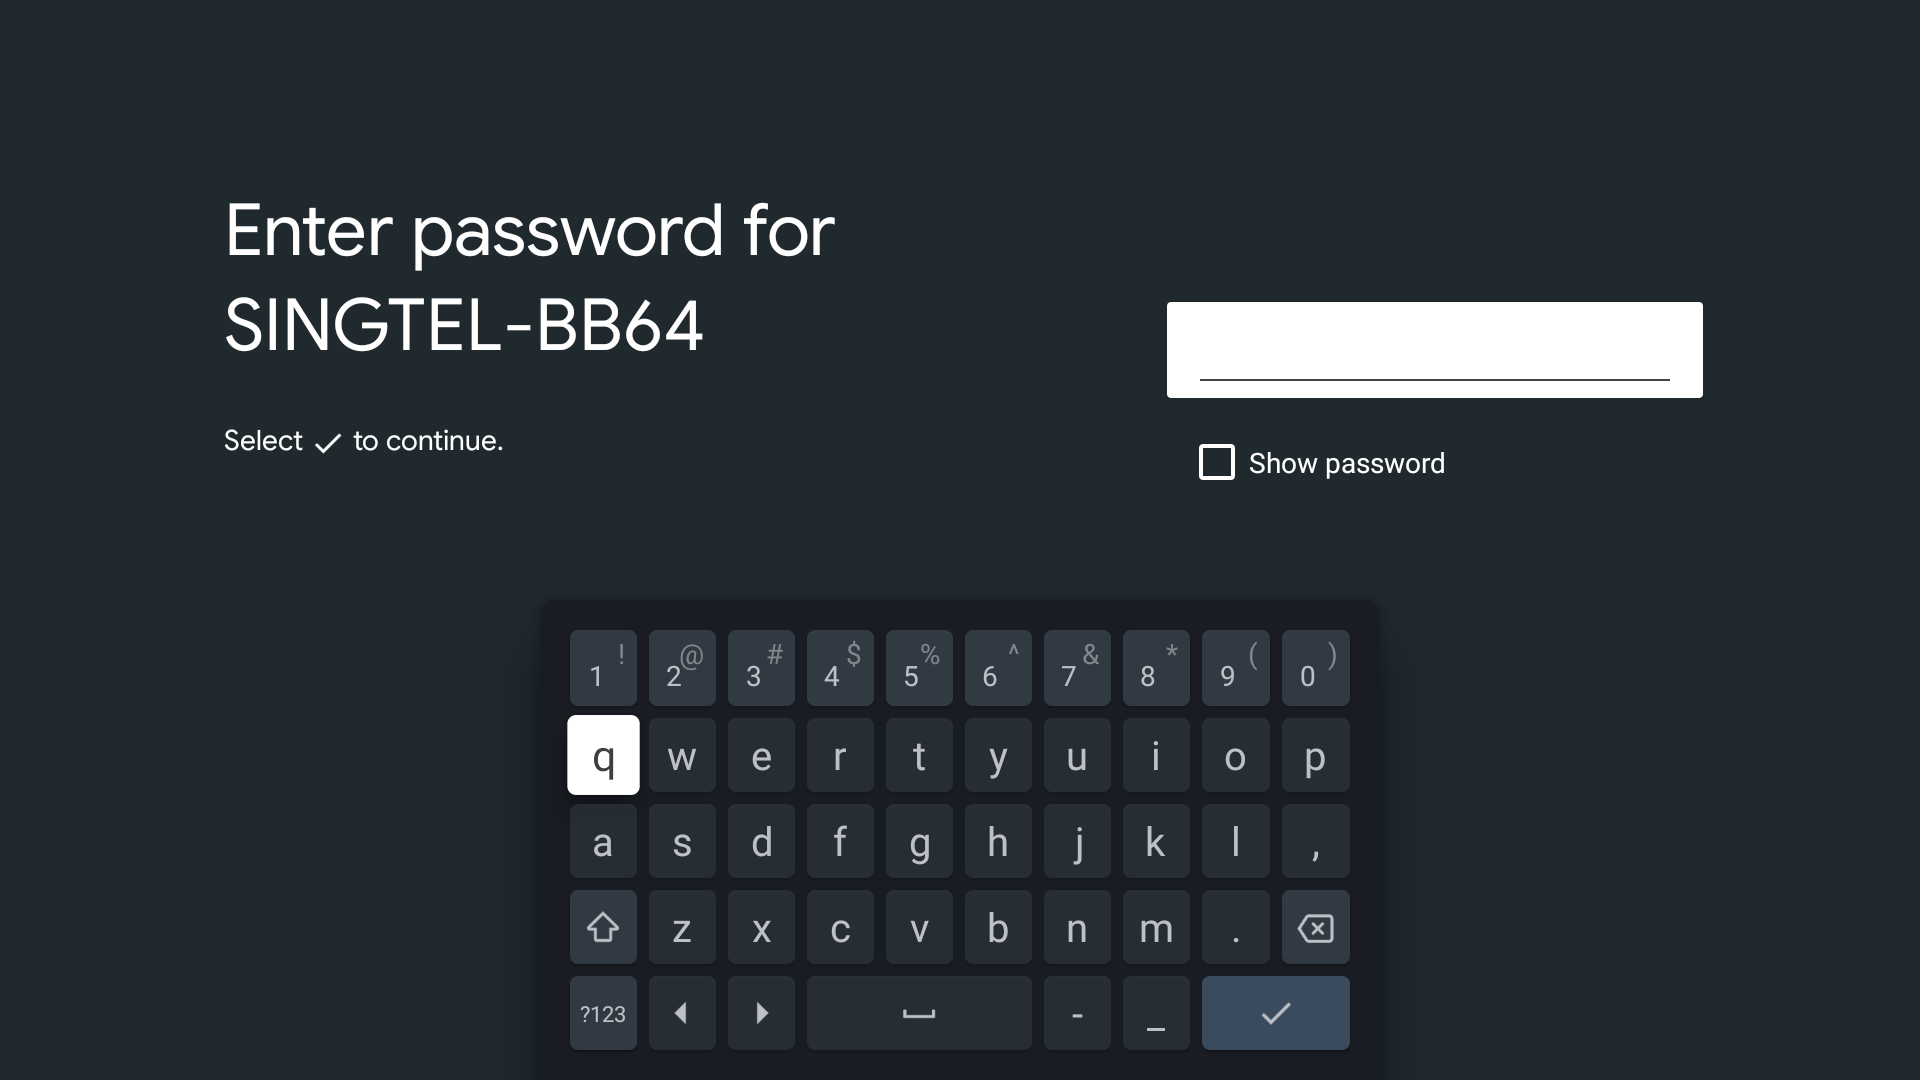
If the on-screen keyboard does not appear, refer to this article: The Virtual keyboard does not appear on the screen, even when a text input box is selected. - Press the up-arrow button on the on-screen keyboard for upper case. Press it again to go back to lower case.
- Security keys are case sensitive. Make sure you use upper case and lower case correctly.
Examples of mistakes:
- I (capital i), l (small L), and 1 (number one)
- 0 (number zero) and O (capital o)
- d (small D) and b (small B)
- 9 (number nine) and q (small Q)
- In most home environments, the IP Address Setting is Auto and the Proxy Setting is No. Contact your Internet Service Provider (ISP) if you are unsure if a Proxy connection has been set up.
Related Information
If you want to connect your TV and mobile phone wirelessly, please refer to the articles below:
IMPORTANT: Not all Sony TVs have the ability to connect to a wireless (Wi-Fi) network, especially older models. To verify whether your TV is compatible, check the TV specifications available in the supplied manual.
Before you start
- Your setup will be different for wireless LAN-ready and built-in wireless LAN TVs. If you don't know which of these your Sony TV is equipped with, refer to the supplied manual. Newer models have built-in wireless LAN capabilities.
- For EX / HX / NX TVs: If you are unable to connect with the wireless LAN adapter, please refer to this article: Unable to connect the wireless LAN-ready TV to communicate with the Internet.
What is the difference between wireless LAN-ready and built-in wireless LAN?
-
Wireless LAN-ready:
The UWA-BR100 wireless LAN adapter lets you bring wireless Internet access to your Wi-Fi ready BRAVIA HDTV. This adapter plugs into the USB input on your TV, and with WPS (Wi-Fi Protected Setup) functionality, it is simple to get your TV connected to your home network no matter what type of Wi-Fi you are using.
Note: The UWA-BR100 USB wireless LAN adapter is discontinued and may not be available. Depending on your TV model, this adapter was supplied or available as an optional accessory.
-
Built-in wireless LAN:
The built-in wireless LAN device allows you to access the Internet and your home network without having to connect a separate adapter. With this feature, you can easily connect to a wireless LAN and enjoy the benefits of networking in a cable-free environment.
How to set up a wireless (Wi-Fi) connection
IMPORTANT:
- If you are using a wireless hub, router, or game adapter, you must select Wired Setup instead of Wireless Setup. Wireless Setup is only for use with Sony wireless LAN-ready TVs (with the USB wireless LAN adapter UWA-BR100) or built-in wireless LAN TVs.
- For wireless LAN-ready TVs, only the UWA-BR100 is supported. PC USB wireless LAN adapters are not.
- Using the network feature, you can connect your TV to the Internet. The setup procedure differs depending on the type of network and LAN router. Before setting up your Internet connection, be sure to set up a wireless LAN router.
Follow the steps below:
- On the remote control, press the HOME button .
- Select Settings.
- Select Network.
- Select Network setup.
- Select Set up network connection or Wireless Setup.
- Select the connection method.
- When connecting automatically with the WPS button on your wireless router (or access point)
Select Easy, Auto, or WPS (Push Button). - When connecting manually after selecting a network from the list of scanned wireless networks
Select Expert, Custom, or Scan.
- Follow the on-screen instructions to complete the setup.
Notes:
- To use WEP security with a wireless router (or access point), select Expert, Custom, or Scan.
- If you do not know the SSID (wireless network name) and password (security key) of your wireless router (or access point), refer to the manual of your wireless router (or access point).
- When the entry screen for the WPA (security) key is displayed, press the Enter button to display the on-screen keyboard.
- For the security key, upper case and lower case are distinguished. Make sure you input the security key correctly.
Examples of mistakes:
- I (capital i), l (small L), and 1 (number one)
- 0 (number zero) and O (capital o)
- d (small D) and b (small B)
- 9 (number nine) and q (small Q)
- To switch between capital letters, small letters, numbers, and symbols on your remote control, refer to this article: How to use the colored buttons on the remote control while using the on-screen keyboard.
- In most home environments, the IP Address Setting is Auto and the Proxy Setting is No. Contact your Internet Service Provider (ISP) if you are unsure if a Proxy connection has been set up.